Bookmark

Sign up or login to use the bookmarking feature.

25 Reading New Words

Page
86
from

25 Reading New Words

Start-Up Activity

Read and discuss pages 86–87, which give strategies for reading new words. Then help students understand consonant blends (page 88), consonant diagraphs (page 89), long vowels (page 90), short vowels (page 91), rhyming families (pages 92–93), contractions (page 94), and compound words (page 95). Help students use what they learn when they encounter new words in their reading.

Enrichment Activity: Give students wide-spaced graph paper and have them write a word horizontally with a letter in each cell. Then have them write another word vertically, making it share one of the letters of the first word. Have them continue this way, crossing words horizontally and vertically until they can't think of other words to cross. Then tell them to fill in the other spaces with random letters. Afterward, ask students to share their word-find puzzles with other students, who will try to solve them.

Think About It

“Learning how to read words is just a starting point.”


State Standards Covered in This Chapter

LAFS Covered in This Chapter

TEKS Covered in This Chapter

TEKS Covered in This Chapter

Page 86-95 from Write One Student Handbook

Lesson Plan

  • It will help if you introduce this chapter with small groups. This way you can model word-recognition processes, and the children can ask questions as you go along. Make sure reading materials are appropriate for the group’s instructional level.

Tips for Reading New Words

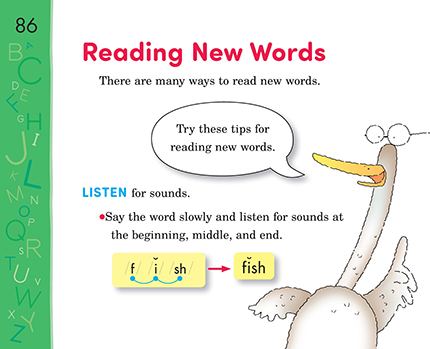
  • Listen for sounds (page 86). Sounding out a word is one strategy children can try. As they try to say the word slowly, they attend to sounds at the beginning, middle, and end of words.

  • Look for parts or patterns you know (page 87). Once children realize that a word is not familiar, they can search for smaller parts or patterns that they already know. Lessons to help with this strategy include activities working with rhyming words (see below), word families, and affixes.

  • Look and think (page 87). Many words can be figured out by sounding out the word and then checking if it makes sense. This requires that children consider both letter sounds and meaning. To help them apply this strategy, ask questions such as, “What letter sound is at the beginning? At the end? Try sounding out the word. Does that make sense in the sentence? Check it. Does it look and sound right?” If not, try again.

  • Ask for help (page 87). Asking for help is a viable way to learn new words. It is through interaction and questioning about words and concepts that many so-called natural readers are born. When a child asks for help, it is valid to just say the word; but, if there is time, it is best to model a strategy that will help the student get this word (and others) independently.

Tips for Teaching Consonants

  • Pronounce each consonant in a blend. Read through page 88 with students. For each consonant blend on the page, have students pronounce the first consonant, then the second, then the two consonants together, and then the whole word. For example, students will first make the sound for "f," then the sound for "r," then the sound for "fr," and finally for "friend." Show students that in all of these consonant blends, they make the sound for each consonant blend with the sound for the one next to it. To provide practice, implement "Say the Blends."

  • For further practice, use "Blends."

  • Change the sounds of the consonants in a digraph. Explain to students that sometimes two consonants join to make a new sound. For each example on page 89, have students make the sound for the first consonant and then the sound for the next consonant. Then you should pronounce the blend and have them repeat the sound, and finally pronounce each word with the blend and have them repeat the words. For example, students will first make the sound for "c," and then the sound for "h," but then you will make the sound for "ch" and the children will repeat it, and finally you will read each word that starts with "ch" while the children repeat: "child . . . child . . . chop . . . chop . . . chick . . . chick." Afterward, implement "Say the New Sounds."

  • For further practice, use "Digraphs," "Blends and Digraphs 1," and "Blends and Digraphs 2."

Tips for Teaching Vowels

  • Show that a vowel followed by another vowel makes a long sound. Point to each bold vowel on page 90 and ask children to name the vowel. Then have them make the sound of the vowel. Show them how the long sound of the vowel is the same as the name of the vowel. Show them that if a vowel follows after another vowel, the first vowel "says its name" (read the examples at the bottom of page 90). Afterward, point out that if a single consonant comes between the two vowels, the first vowel still says its name (read the examples at the top of page 90). Implement "Say the Vowel Names."

  • For further practice, use "Long Vowels 1" and "Long Vowels 2."

  • Show that a vowel not followed by another vowel makes a short sound. Lead students through the material on page 91. Pronounce the short "a" sound, and then pronounce the word "map." Have students repeat the sounds. Point out that the "a" is not followed by another vowel, so it has a short sound. Do the same with the other vowels and the example words. You can also point out that if two consonants separate two vowels, the first vowel still has a short sound, as in "mapping" or "hopped." Use "Make the Short Vowel Sounds" to provide students with practice.

  • For further practice, use "Short Vowels 1" and "Short Vowels 2."

Tips for Teaching Rhyming Families

  • Tell students that rhyming words end in the same sounds. Present pages 92-93 to students. Pronounce "hat." Then point to the next word, "bat," and ask students how it is different. (It starts with a "b" instead of an "h.") Say, "If this word is 'hat,' then what is this word?' " After student successfully read "bat," move on to the next word and ask what it is, and the next. Follow this pattern for each word on pages 92-93. Afterward, tell students that anytime they see a new word that ends like a word they already know, they can sound out the new word and read it and write it. Implement "Rhyme Time!"

  • For further practice, use "Rhyming Families 1" and "Rhyming Families 2."

Tips for Teaching Contractions and Compounds

  • Show students how letters are crossed out to make a contraction. Write "I am happy!" on the board. Speak the sentence aloud while acting happy. Then say, "Sometimes I am so happy, I want to say it even faster—I'm happy!" Write "I'm happy!" on the board. Ask students what the difference is between "I am happy!" and "I'm happy!" Show them that the letter "a" is gone, and so is the space between "I" and "am." What shows that these things are left out? The apostrophe. Help students understand that in a contraction, we leave out spaces and some letters and replace them with an apostrophe. Lead students through the other examples on page 94. Then implement "Cut It Out!"

  • For further practice, use "Contractions."

  • Show that compound words happen when two words are joined. Draw a picture of a fish and ask students what it is. Then write the word "fish" underneath it. Afterward, draw a picture of a hook for hanging a coat and ask students what it is. Write the work "hook" underneath it. Then say, "A fish is one thing, and a hook is something else. But we can put the two words together to create a specific kind of hook." Write the word "fishhook" and draw a fishhook on the end of a string underwater. "When two words join to make a new word, the new word is called a 'compound word.' " Lead students through the other examples on page 95. Then implement "Join Us!"

  • For further practice, use "Compound Words."

State Standard Reference:
LAFS Standard:
TEKS Standard:
NE ELA Standard:

Related Resource Tags

Click to view a list of tags that tie into other resources on our site

Level:
English Language Arts: