This awesome photojournalism project comes from Cindy Smith of Karcher Middle School in Burlington, Wisconsin. Students research a historic spot in their community and create a slide show or digital story that portrays the history of the spot in images and words. You can use this project in your classroom to develop students' thinking, reading, writing, speaking, and literacy skills—all while connecting kids to the community and to history.
Steps for Implementing the Photojournalism Project
- Activate your students' prior knowledge. Ask questions to get students thinking about the history of your community:
- What are your favorite places in our community?
- What are the oldest buildings?
- How has our community changed over time?
- When was our community founded? By whom? Why?
- Pose a strong driving question.
- How can photographs capture the history of a place in our community?
- Share the project plan with your students. Hand out planning sheets like the one shown here. (Download a planning sheet template that you can alter and fill out.) Review the plan so that your students understand their goal and objectives, the tasks they need to complete, the time for each task, and the team and tools available to them. Also, let them know that the goal and objectives will be used in the rubric for grading the project.

View "Creating a Plan" minilesson.
- Students go out into the community to take pictures of historic places. Depending on your community and school, you could lead your class on a walking tour of historic places, or you could send out teams of students (with a map, a time limit, and a requirement to come back with usable photos of historic spots). Have your students use their phones to take pictures, or equip them with digital cameras.
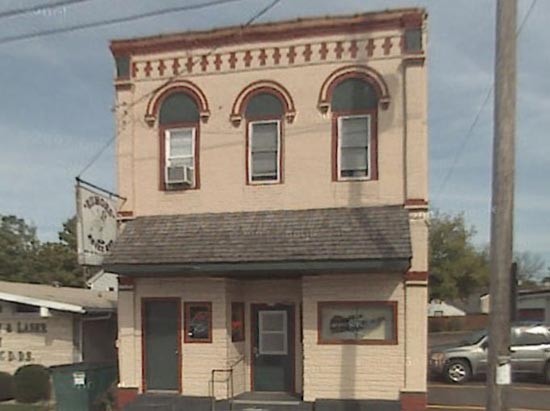
- Students download pictures and present them to the class. Have each student identify the historic spots that he or she chose and indicate why they are interesting. One student took this picture of an old building on Main Street in Burlington and said, "It's weird because it's two stories tall and skinny but really long. It's totally different from other buildings there."
- Students select a location to research. Tell students they need to choose one of the sites they photographed. Remind them to choose a site they can explore deeply, finding many photos, facts, anecdotes, and community connections.
- Students research their historic spots. Tell them that their slide shows or digital stories need to have a rich array of visual and textual information. Suggest (or require) some of these research sources:
- Library
- Historical Society
- City Hall or Register of Deeds
- Internet
- Community Members (interview in person or via email or phone)
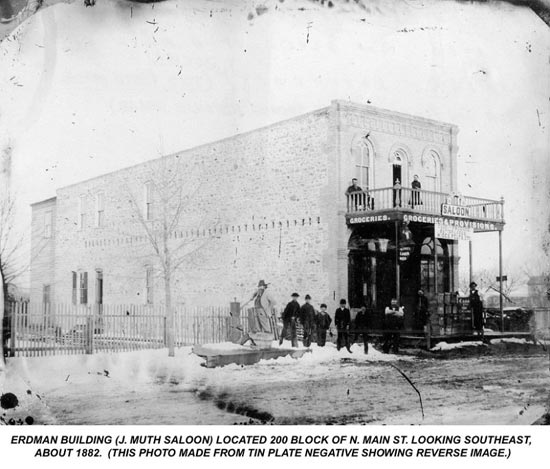
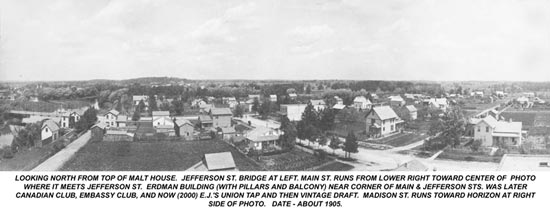
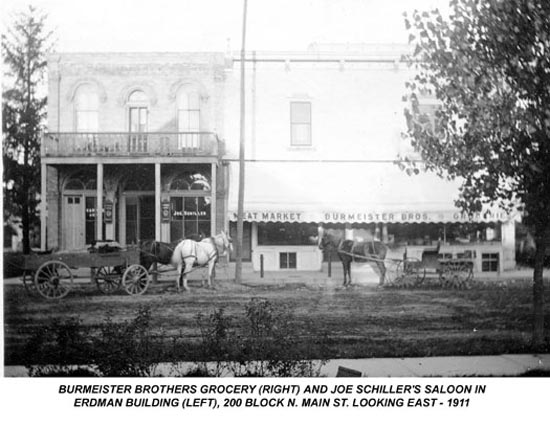
- Students create their slide shows or digital stories. Have students use their own computers and software, or you can schedule time in the computer lab to allow them to complete their projects. The student who chose to research the building on Main Street learned that it was so narrow and deep because settlers there wanted the center of Burlington to be on their side of the Fox River. Buildings needed to have narrow fronts to maximize the number of businesses that could fit on Main Street. However, the true center of town developed west of the Fox River, along Pine Street. This building is the only one of its kind to remain on Main Street. Here are some of the historical photos that the student included in her slide show.
- Students evaluate their presentations using a rubric based on the planning sheet. Provide your students with a rubric like the one below. (Download a rubric template that you can modify and that your students can fill in.) Note how the goal and objectives from the planning sheet have been copied and pasted into the first column of the rubric.
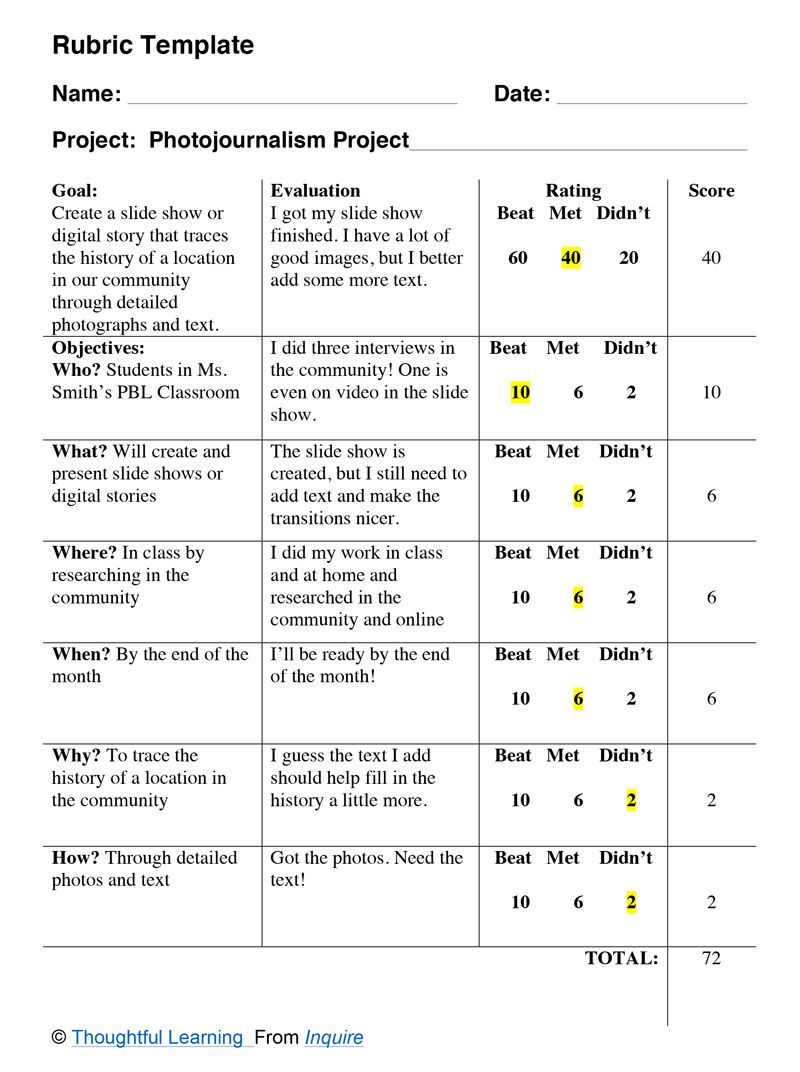
- Students write Evaluations of how well they achieved the goal and objectives.
- Then they rate whether they Beat, Met, or Didn't meet the goal and each objective.
- Finally, they add up their Scores, getting a percentage for the project. (A student who only meets the goal and each objective would be expecting an average grade of 76, or a C. A student who has exceeded the goal and all objectives could anticipate a score of 120, which would be an A+. You could even offer any points over 100 as extra credit, an incentive for students to excel).
- Students use their rubrics to decide how to improve their projects before they present them for the grade.
View "Creating a Rubric to Evaluate Projects" minilesson.
- Students present their slide shows and digital stories to the class and to community participants. Students invite the people they interviewed to come to class to see their presentations. All community partners also receive the presentations digitally. As each student presents to the class, you evaluate their presentations using the same rubric sheet that the students had used.
Why Is This Project So Powerful?
This photojournalism project is powerful for many reasons:
- Student-centered: Starting at step 4 in the instructions above, students are driving the project forward. As teacher, you set up the project (steps 1-3) but then allow students to do the work. You function as the "guide on the side" rather than the "sage on the stage."
- Active: Students must seek out answers and materials rather than sitting and waiting for content to come to them. They learn details that no one in your class knew before. Sharing that information about the community is exciting because the students have become the teachers.
- Authentic: Students study real places, learning about something that has caught their interest and thereby learning about their whole communities.
- Community-based: Students get out of the classroom to explore. They interview people connected to the site they have chosen, and they work collaboratively with adult resources to complete their research.
- Real audience: Students present their projects not just to you for a grade, or even just to the class, but also to the community partners they have worked with.
- Real purpose: Students immediately see that their work will be valued by the community members who helped them create their projects. The full set of presentations could be offered as a digital exhibit on the historical society's Web site.
- Goal-oriented: Students know from the start what their goal and objectives are. When they create their slide shows or digital stories, they use their goal and objectives to perform a self-evaluation and figure out how to improve their work. They know you will use the same rubric to give them a final grade.
- Rigorous and standards-based: Students think deeply about their subjects, read and write about them, interview community members, use technology, and come up with polished presentations that have correct use of language. This table shows the 8th grade Common Core State Standards covered by this project. (The project can work for students from grades 6-12 and beyond.)
|
Reading Informational Texts |
CCSS.ELA-LITERACY.RI.8.1 CCSS.ELA-LITERACY.RI.8.3 CCSS.ELA-LITERACY.RI.8.5 CCSS.ELA-LITERACY.RI.8.6 CCSS.ELA-LITERACY.RI.8.7 CCSS.ELA-LITERACY.RI.8.9 CCSS.ELA-LITERACY.RI.8.10 |
|---|---|
|
Writing |
|
|
Speaking and Listening |
CCSS.ELA-LITERACY.SL.8.1 CCSS.ELA-LITERACY.SL.8.1.A CCSS.ELA-LITERACY.SL.8.1.B CCSS.ELA-LITERACY.SL.8.1.C CCSS.ELA-LITERACY.SL.8.1.D CCSS.ELA-LITERACY.SL.8.2 CCSS.ELA-LITERACY.SL.8.4 CCSS.ELA-LITERACY.SL.8.5 CCSS.ELA-LITERACY.SL.8.6 |
|
Language |
CCSS.ELA-LITERACY.L.8.1 CCSS.ELA-LITERACY.L.8.2 CCSS.ELA-LITERACY.L.8.3 CCSS.ELA-LITERACY.L.8.6 |